This post may contain affiliate links. Please read my disclosure policy.
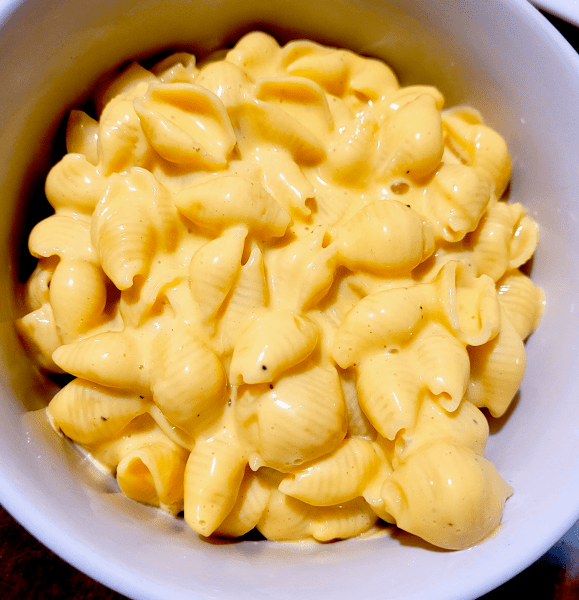
The best mac & cheese using Velveeta! Velveeta is such a great cheese to use because of its comforting creaminess. With the addition of some mustard powder and onion powder, you can transform boring mac & cheese into a dreamy, cheesy, and delicious mac & cheese!
Whenever I make mac & cheese, it’s always with Velveeta. While I am not sponsored by them (though I wish I was…), I do love their mac & cheese products. My favorite one happens to be the queso blanco one. Throw a can of Rotel tomatoes & chiles and you have a great easy queso mac & cheese.
Velveeta has been with us all and takes us back to our childhoods. It’s been around since 1918, gracing food with its presence from grilled cheese sandwiches to smooth cheese sauce. It’s used in casseroles, to make a nacho cheese dip with, and so many more. You can top my mac & cheese with breadcrumbs and bake it—it won’t dry out while baking! That seems to be a HUGE issue when people bake mac & cheese (at least the few baked mac & cheeses I’ve had throughout my life…they were always dried out and not worth putting onto my plate)—or add some veggies to it like steamed broccoli or peas & carrots. You can even add bacon bits or shredded chicken/turkey. The possibilities are endless with mac & cheese!
How to make Creamy Velveeta Mac & Cheese
The most important ingredient is the Velveeta. My recipe is super easy to follow and doesn’t take long either. It’s much better than the boxed mac & cheese with the disgusting cheese powder (sorry not sorry!). This recipe can be made a day in advance to bake! (Full ingredient amounts and complete instructions are available in the recipe card down below).
- Velveeta Cheese Block: When I make my mac & cheese, I make sure I use A LOT of cheese. I tend to buy a 32 oz block to ensure you get all of the cheesiness that Velveeta has to offer. No such thing as too much cheese! You can, of course, put in less cheese if you’re worried about cholesterol.
- Flour & Butter: For the roux to create a smooth & creamy cheese sauce.
- Milk: I only use milk because heavy cream will make the cheese sauce too thick. If you were using shredded cheese, then heavy cream may be a better idea.
- Medium-Sized Shells or Elbow Pasta: I like using shells because it picks up the cheese sauce better than elbows. Use whichever one you want! Some people even use cavatappi pasta.
- Salt, Pepper, Onion Powder, Dry Mustard: Cheese is already salty, so watch how much salt you put in there!
Cook the pasta according to the package directions. Drain and set aside. In a large sauce pot over medium heat, melt the butter then whisk in the flour. Cook the roux, whisking frequently until the aroma is nutty and the roux is almost golden brown, any darker and you will need to start over! Pour in the milk and whisk constantly until it starts to thicken up, creating a bechamel. Add in the seasonings and the cheese a few cubes at a time. Stir it in until the cheese starts to melt into the bechamel. Continue adding in the cheese until no cubes remain in the sauce. Mix in the pasta and stir to coat well with the cheese.
Tips & FAQs
- Storage: Keep in an airtight container in the fridge for up to 4 days.
- Freeze: Mac & cheese is amazing at freezing! Allow the mac & cheese to cool completely, then transfer it into a freezer-safe airtight container or freezer Ziploc bag for up to 2 months. Don’t forget to label & date it! (Because I do…)
- Reheat: If you are reheating from the fridge, you can microwave it with a bit of milk to loosen it up, if needed. You can also heat it up in a casserole dish in your oven at 325F for 20 minutes. Stir in a bit of milk after if needed. If you are reheating from frozen, you can use the same methods to heat it up, however, times may vary because it’s frozen. You may need to allow more time for reheating.
- Make Ahead: This can be made up to 2 days in advance, then reheated on the stovetop or baked in the oven. For some reason, mac & cheese always tastes better the next day.
- Can you make this in the Instant Pot/Slow Cooker? While I haven’t tested that yet, I’m 100% sure you can! Those will be listed under different posts. Keep a look out for those in your email in the future!
- Variations: There’s so much you can do with mac & cheese! It’s like a blank canvas asking to be painted on.
- Meats: You can make it a cheeseburger or taco mac & cheese with ground beef and the right seasonings. Throw in some crispy bacon bits or canned tuna. Add in shredded chicken or turkey. I topped it off with some leftover Copycat Chipotle Chicken.
- Veggies: Jalapenos (fresh or pickled) are perfect for turning up the heat. Add in some steamed broccoli, peas & carrots, or even cauliflower. Add in a can of Rotel diced tomatoes & chiles or black olives.
- Styles: You can make this a taco mac & cheese, add in some pesto and chopped tomatoes & top with a balsamic glaze for a Caprese-like mac & cheese, cheeseburger mac & cheese, pumpkin or butternut squash mac & cheese, and so SO many more.
Want the recipe? Click print below! Let me know how it came out for you by tagging me on Instagram (@missravenskitchen) and using #missravenskitchen! Follow my Facebook page for updates as well! Let me know if I need to tweak anything.

Creamy Velveeta Mac & Cheese
Ingredients
- 32 oz Velveeta cheese block, cut into 1-inch cubes
- 1 box (16 oz) elbow or medium shell pasta
- 4 tbsp unsalted butter
- 4 tbsp flour
- 2 1/2 cups whole or 2% milk
- 1/2 tsp salt, or more to taste
- 1/4 tsp ground black pepper
- 1/2 tsp onion powder
- 3/4 tsp dry ground mustard powder
Instructions
- Cook the pasta according to the package directions. Do not salt the pasta water. Drain then set aside.
- In a large saucepot over medium heat, melt the butter and whisk in the flour, creating a roux. Cook the roux, whisking frequently until there is a nutty aroma and the roux is almost golden brown, about 5 minutes. Do not walk away from this! If it gets any darker or burned, you will need to start over.
- Pour in the milk and whisk constantly until the sauce starts to thicken and become smooth, about 3 to 5 minutes total. Add in the salt, pepper, onion powder, and dry ground mustard powder. Whisk to incorporate.
- Start adding a few cubes of cheese at a time, whisking until it’s melted into the sauce. Repeat with the remaining cheese cubes. Taste and add more salt, if desired.
- Mix the pasta into the cheese sauce until completely coated. Serve immediately.
- Take 1 cup of breadcrumbs and 1/4 cup of melted butter and mix them together. Set aside.
- Put the mac & cheese into a 9×13-inch baking dish. Top with the breadcrumbs and bake, uncovered, at 350F for 20-30 minutes, or until the top is golden and crispy.
- This is not included in the nutritional information. Baking with the breadcrumbs is optional.
Notes
Storage: Keep in an airtight container in the fridge for up to 4 days.
- Freeze: Mac & cheese is amazing at freezing! Allow the mac & cheese to cool completely, then transfer it into a freezer-safe airtight container or freezer Ziploc bag for up to 2 months. Don’t forget to label & date it! (Because I do…)
- Reheat: If you are reheating from the fridge, you can microwave it with a bit of milk to loosen it up, if needed. You can also heat it up in a casserole dish in your oven at 325F for 20 minutes. Stir in a bit of milk after if needed. If you are reheating from frozen, you can use the same methods to heat it up, however, times may vary because it’s frozen. You may need to allow more time for reheating.
- Make Ahead: This can be made up to 2 days in advance, then reheated on the stovetop or baked in the oven. For some reason, mac & cheese always tastes better the next day.
Can you make this in the Instant Pot/Slow Cooker? While I haven’t tested that yet, I’m 100% sure you can! Those will be listed under different posts. Keep a look out for those in your email in the future!
Variations: There’s so much you can do with mac & cheese! It’s like a blank canvas asking to be painted on.
- Meats: You can make it a cheeseburger or taco mac & cheese with ground beef and the right seasonings. Throw in some crispy bacon bits or canned tuna. Add in shredded chicken or turkey. I topped it off with some leftover Copycat Chipotle Chicken.
- Veggies: Jalapenos (fresh or pickled) are perfect for turning up the heat. Add in some steamed broccoli, peas & carrots, or even cauliflower. Add in a can of Rotel diced tomatoes & chiles or black olives.
- Styles: You can make this a taco mac & cheese, add in some pesto and chopped tomatoes & top with a balsamic glaze for a Caprese-like mac & cheese, cheeseburger mac & cheese, pumpkin or butternut squash mac & cheese, and so SO many more.
Nutrition Facts
Calories
763.15Fat (grams)
28.23Sat. Fat (grams)
17.7Carbs (grams)
82.69Fiber (grams)
2.62Net carbs
80.07Sugar (grams)
19.79Protein (grams)
43.45Sodium (milligrams)
920Cholesterol (grams)
96.05The nutrition information provided is an estimate and will vary based on cooking methods and the brands of ingredients used. This does not include any extra salt added.


Leave a comment